Angular 4: Understanding Components
If you have followed my previous post on how to use angular-cli to generate an Angular app you may have noticed that it generated AppComponent as the root,in this post we will have a closer look at it to understand what a component is.
The simplest way to define a component is a class which is decorated with an attribute and has an html view which get rendered into the DOM.I have taken the AppComponent example to explain how it compares to a C# class.

It looks pretty close to ASP.NET MVC controller or any C# class with an attribute and it has a view called app.component.html which will get generated into the DOM.
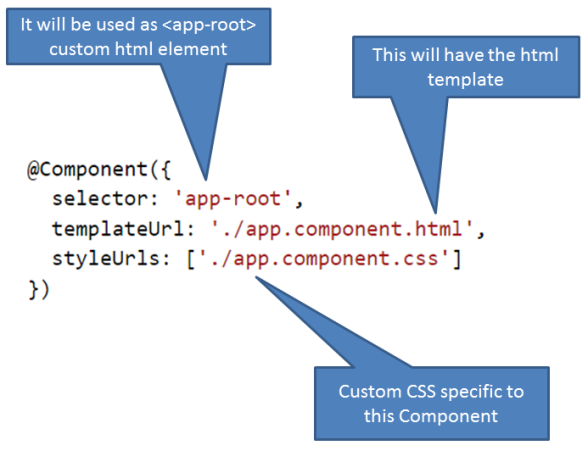
The key thing is the @Component decorator takes a JSON anonymous object in which we specify the template URL and the custom styles to be used for this component. Here is an illustration of this.
And this is how the root component is wired up to the index.html page.
<body>
      <app-root>Loading...</app-root>
</body>
Another interesting thing to notice is that the component has a property name “title” and by the virtual of the fact that a class is decorated with @Component attribute angular will allow you to bind this property to the view (template) using the double moustache syntax i.e. {{ }} which is also referred to as interpolation.

This is called one-way data binding as the data flows from the object to the view but not both ways, however it is easy to implement a two way by using the [(ngModel)] syntax as shown below.
<h1>
  {{title}}
</h1>
<input [(ngModel)]="title" />
After saving your changes and the page has refreshed if you type anything in the text box it will be immediately be reflected in the h1 header as shown below.

I hope this post has helped you if you are coming from a non angular background and to understand how thing works in angular.
Angular 2: Adding bootstrap css framework
In my previous post I showed you how to create an Angular 2 application using angular-cli tool. This post is a continuation of that and in this post I am going to show how to use node package manager npm to add bootstrap stylesheet and wire it up in the application.
I am going to open the nodejs command prompt and install the bootstrap css package to the project using the following command.
If you browse to the node_modules folder you can see the new folder bootstrap was created which contains all the stylesheets as shown below.

In order to make the stylesheet available for the page we have to add the path of the file to the styles array which is defined in the .angular-cli.json file. Since it is an array you can add multiple stylesheets and the loader will take care of it.
.angular-cli.json
"styles": [
        "../node_modules/bootstrap/dist/css/bootstrap.min.css",
        "styles.css"
      ]

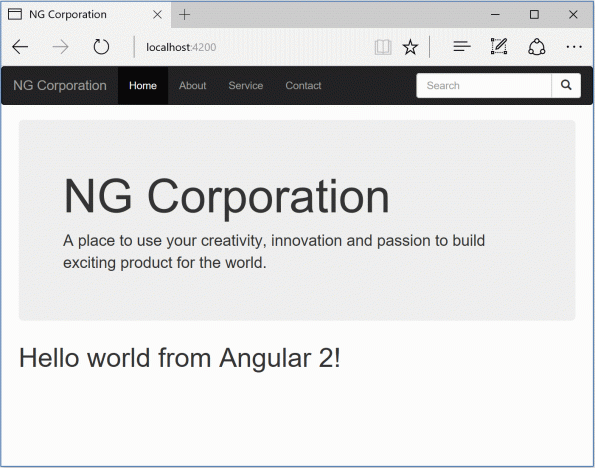
Now I am going to add some menu with the search text box and a jumbroton layout to give it a nice look.
<body>
  <nav class="navbar navbar-inverse">
  <div class="container-fluid">
    <div class="navbar-header">
      <a class="navbar-brand" href="#">NG Corporationa>
    div>
    <ul class="nav navbar-nav">
      <li class="active"><a href="#">Homea>li>
      <li><a href="#">Abouta>li>
      <li><a href="#">Servicea>li>
      <li><a href="#">Contacta>li>
    ul>
    <form class="navbar-form navbar-right">
      <div class="input-group">
        <input type="text" class="form-control" placeholder="Search">
        <div class="input-group-btn">
          <button class="btn btn-default" type="submit">
            <i class="glyphicon glyphicon-search">i>
          button>
        div>
      div>
    form>
  div>
nav>
  <div class="container">
    <div class="row">
      <div class="jumbotron">
        <h1>NG Corporationh1>
        <p>A place to use your creativity, innovation and passion to build exciting product for the world.p>
      div>
        <app-root>Loading...app-root>
      div>
  div>
body>
As you can see pretty standard bootstrap template and at the end we have our angular component with the custom selector “app-root”. Last thing we have to do is to run the following command in order to start the application.
And here is the angular 2 application up and running with bootstrap styling.
Getting started with Angular CLI
In this post I am going to show you how to install angular-cli and create a new Angular 2 application. It will be very useful if you are familiar with NodeJS, Node Package Manager(npm), TypeScript and Visual Studio Code (VSCode).
Lets get started with downloading NodeJs from https://nodejs.org/en/download/.

There are plenty of operating system to choose and since I am on Windows 10 64-bit, I am going to use the Windows Installer(.msi) 64-bit. This will install the nodejs runtime. Search and open the nodejs command prompt and install the angular-cli package using npm.

If you are using a proxy server then you might have to set the "https-proxy " value in the npm configuration as shown below.
and after a while you will see that the angular-cli installation was successful.

Lets check the version of the angular-cli by using the following command.

As you see I am using nodejs version 6.9.2 and angular-cli is in rc1 although the current version is rc2 which has been released a couple of days ago.
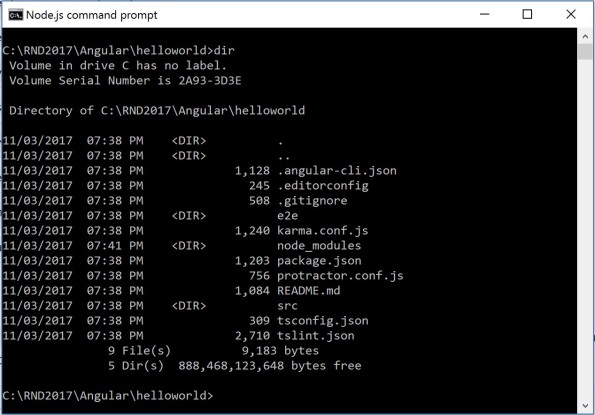
So after all the required installation I’m now going to create a new application helloworld using the angular-cli.

and you will see that the angular-cli has created a bunch of folders and files under the helloworld folder.
In order to run the application I’m going to use the ng serve command to run the application.

By default the application runs on port 4200 so lets browse to http://localhost:4200 and you can see the application is up and running and you can change the default port to any port by specifying the –p parameter to the ng serve command.

Lets open the project root folder using Visual Studio Code and modify the app.component.ts (TypeScript) file.

As soon as I change the title property of the AppComponent to "Hello world from Angular 2" the page automatically refreshes and shows my changes, I don’t have to hit F5 or refresh the page at all.

Congratulations you just created your first Angular 2 application using angular-cli.
CodeTrack
A free .NET performance profiler and execution analyzer http://www.getcodetrack.com/
Custom filters in AngularJS
In this post I am going to show you how easy it is to write custom filters in AngularJS and for the simplicity of the demo I am going to display a list of cron-jobs in a tabular data. Each job has details like the Id, action etc. and has a status which is represented in numbers like 0,1,2 etc. This may be suitable from a storage or system point of view but is not that user-friendly, so lets write a custom filter to transform numeric values into user-friendly status.
First we start with an AngularJS controller "CronJobsController" and it will be responsible for calling the cronjobs ASP.NET Web API.If the call is successful the returned data is assigned to $scope.jobs object so that we can bind the data to our view.
app.js
var app = angular.module('mainApp', []);
app.controller('CronJobsController', function ($scope,$http) {
    $scope.jobs = [];
    $http({
        method: 'GET',
        url: '/api/cronjobs'
      })
      .then(function(response) {
        $scope.jobs = response.data;
      },function(reason) {
        $scope.error = reason.data;
      });
});
Next step is to wire up the "myApp" to the HTML page by using the ng-app directive.
CronJobs.html
<body ng-app="mainApp">
    <!--Html omitted for brevity -->
</body>
Now I am going to create the view by adding some table mark-up and use bootstrap to format the HTML table. For data binding I’m going to use the ng-repeat directive to enumerate through the jobs and bind the data to the table.
CronJobs.html(cont.)
<div class="row">
    <!-- Jobs Controller Scope -->
    <div class="col-md-12" ng-controller="CronJobsController">
        <table class="table table-striped">
            <thead>
                <tr>
                    <th>Id</th>
                    <th>Correlation Id</th>
                    <th>Action</th>
                    <th>Created</th>
                    <th>Status</th>
                </tr>
            </thead>
            <tbody>
                <tr ng-repeat="job in jobs">
                    <td>{{job.id}}</td>
                    <td>{{job.correlationId}}</td>
                    <td>{{job.action}}</td>
                    <td>{{job.created | date:'dd-MM-yyyy'}}</td>
                    <td>{{job.status}}</td>

                </tr>
            </tbody>
        </table>
    </div>
    <!-- End of Jobs Controller Scope -->
</div>
Lets run the application and we can see that everything is working perfectly.

Now we are going to build our custom filter "status" which will return a user-friendly status based on the numeric value.
statusfilter.js
/// <reference path="app.js" />

app.filter('status', function() {
    return function(status) {
        switch(status) {
            case 0:
                return "Not Started";
            case 1:
                return "In Progress";
            case 2:
                return "Completed";
            default:
                return "Unknown";
        }
    }
})
Nothing special here a simple switch case statement returning user-friendly text and all is left is to apply this filter to our model’s status property as shown in below code snippet.
<td>{{job.status | status}}</td>
And after applying the filter we can see the user-friendly status is displayed instead of the numbers.

It’s a very simple yet powerful feature and another reason to love AngularJS.
ASP.NET Core – Exceeds 1.15 Million request/s
Congratulations to the ASP.NET Core team for hitting this amazing milestone of 1.15 Million request/s http://www.ageofascent.com/asp-net-core-exeeds-1-15-million-requests-12-6-gbps/ . Now is an amazing time to work with ASP.NET Web API and AngularJS.
Shaping up with Angular.js
This is one the finest and free AngularJS webcasts I have seen so far . If you are new to AngularJS development and want to learn AngularJS but have no clue where to start then this is tutorial to go for.
https://www.codeschool.com/courses/shaping-up-with-angular-js .
Thanks to the guys at codeschool to make this fun driven tutorial which is so exciting to watch and learn. 🙂 ❤
Table Splitting in Entity Framework
In my previous post I covered the Entity Splitting technique and in this post I am going to talk about just the opposite of that technique.
Table Splitting:- In this scenario there are multiple entities or domain objects but the data is stored in a single table. Lets say in our database we have an employee table which stores basic information like first name, last name, DOB as well their photo. However in our domain model we want to create two different entities.
Lets write our domain objects to see this is action.
Employee.cs
public class Employee
{
    public int Id { get; set; }
    public string FirstName { get; set; }
    public string LastName { get; set; }
    public string Email { get; set; }
    public DateTime DOB { get; set; }
    public virtual EmployeePhoto Photo { get; set; }
}
EmployeePhoto.cs
public class EmployeePhoto
{
    public int Id { get; set; }
    public byte[] Photo { get; set; }
    public Employee Employee { get; set; }
}
As you can see we have define two entities Employee and EmployeePhoto in our domain model and we have declared EmployeePhoto as virtual, with this declaration we can take advantage of lazy loading and when we query the Employee entity through EF the photo column will not be selected as part of the linq query. Second it also indicates that EmployeePhoto entity cannot exist without an Employee. It is also important that EmployeePhoto has a reference of Employee entity and has an Id properties which we will use to map the two entities into one table.
Lets wire up the relationship in our context class as shown below.
EmployeeContext.cs
public class EmployeeContext : DbContext
{
    public DbSet<Employee> Employees { get; set; }
    public DbSet<EmployeePhoto> Photos { get; set; }

    protected override void OnModelCreating(DbModelBuilder modelBuilder)
    {
        modelBuilder.Entity<EmployeePhoto>().HasKey(p => p.Id);

        modelBuilder.Entity<Employee>()
            .HasRequired(e => e.Photo)
            .WithRequiredPrincipal(p => p.Employee);

        modelBuilder.Entity<EmployeePhoto>().ToTable("Employee");
        modelBuilder.Entity<Employee>().ToTable("Employee");
        modelBuilder.Conventions.Remove<PluralizingTableNameConvention>();
    }
}
We first defined the secondary entity( Employee Photo ) that and state that it has an identity key which is identical in our main entity. Next in our Employee entity we defined that the photo property is required with the Employee as the primary entity and then using ToTable function we map both the entity to the same table i.e. Employee.
Entity Splitting in Entity Framework
I have done a lot of post on Entity Framework Code First which includes some simple tips and tricks to more complex scenarios of mapping relationship and here are some of those post if you want to read them.
However recently I was helping a friend of mine to understand Entity Framework modelling for a legacy system. Since the schema is already defined it becomes a bit difficult to create a rich domain model keeping the model in your design. The other thing I have seen is that people simply follow the schema and let schema dictating what your domain is, which in my opinion is not correct.
Anyways, after some discussion I realized that they are not taking advantage of Entity Splitting in Entity Framework, so I thought about blogging it.
Entity Splitting:- In this scenario there is a single entity or domain object but the data is stored in multiple tables with a one to one relationship. For example lets say the domain is a fitness/health industry and you have customer table which stores basic information like first name, last name, DOB in the customer table and other vital stats like resting heat beat,blood type,cholesterol level, blood pressure, Sugar level etc. in their health information table. However in your domain model the customer object is composed of both information.
Lets see this in action.
Customer.cs
public class Customer
{
    public int Id { get; set; }

    public string FirstName { get; set; }

    public string LastName { get; set; }

    public DateTime DOB { get; set; }

    public int RestingHeartBeat { get; set; }

    public string BloodType { get; set; }

    public decimal Cholesterol { get; set; }

    public string BloodPressure { get; set; }
}
So this is my domain object which represents the whole customer object however in the legacy system some information is stored in the Customer table and some in the VitalStats table.
And lets write the configuration for customer in which we will split the entity into two different tables using the Map and ToTable function as shown below.
CustomerConfiguration.cs
public class CustomerConfiguration : EntityTypeConfiguration<Customer>
{
    public CustomerConfiguration()
    {
        this.Map(c =>
       {
           c.Properties(p => new
           {
               p.Id,
               p.FirstName,
               p.LastName,
               p.DOB
           });
           c.ToTable("Customer");
       })
        .Map(v =>
       {
           v.Properties(p => new
           {
               p.Id,
               p.BloodPressure,
               p.BloodType,
               p.Cholesterol,
               p.RestingHeartBeat
           });
           v.ToTable("VitalStats");
       });
    }
}
And here is my DbContext class.
public class HealthContext : DbContext
{
    DbSet<Customer> Customer { get; set; }

    protected override void OnModelCreating(DbModelBuilder modelBuilder)
    {
        modelBuilder.Conventions.Remove<PluralizingTableNameConvention>();
    }
}
Entity Framework 7: In Memory Testing
I am really excited about the in-memory testing feature of Entity Framework 7 as testing in the previous versions of Entity Framework wasn’t straight forward and painful at times .
Let’s get started by installing the Entity Framework “InMemory” testing nuget package and make sure you have selected the “Include Prerelease” in the nuget dialogue as Entity Framework 7 is still in beta 6.

Alternatively the old-fashioned way
As you can see that when we install the EntityFramework.InMemory package it also brings the EntityFramework.Core package.These are some of the new changes to Entity Framework as EF has been decomposed into smaller manageable packages.
Lets start writing our domain objects and I am going to use the simple example of Student and Course as show below.
Student.cs
public class Student
{
    public Student()
    {
        Courses = new HashSet<Course>();
    }
    public int Id { get; set; }

    public string FirstName { get; set; }

    public string LastName { get; set; }

    public ICollection<Course> Courses { get; set; }

    public override string ToString()
    {
        return
            string.Format(
                    "Id = {0}, FirstName = {1}, LastName = {2}",
                    this.Id,
                    this.FirstName,
                    this.LastName);
    }
}
Course.cs
public class Course
{
    public int Id { get; set; }

    public string Name { get; set; }

    public string Description { get; set; }

}
Next we will define the database context and this is where you will see a significant change to the previous version. In the constructor of our context we are creating a dependency on DbContextOptions which will decide which source to use to persist the data.
TrainingContext.cs
public class TrainingContext : DbContext
{
    public TrainingContext(DbContextOptions options)
        : base(options)
    {
    }

    public DbSet<Student> Student { get; set; }

    public DbSet<Course> Course { get; set; }
}
Now we will wire up the TrainingContext to the main program and using the DbContextOptionsBuilder we will instruct the entity framework to use the in-memory database. I also created a separate method to populate the student table with 2 records.
Program.cs
class Program
{
    static void Main(string[] args)
    {
        var optionsBuilder = new DbContextOptionsBuilder<TrainingContext>();
        optionsBuilder.UseInMemoryDatabase(true);

        using (var context = new TrainingContext(optionsBuilder.Options))
        {
            AddStudentData(context);

            var student = context.Student.FirstOrDefault(x => x.Id == 1);

            Console.WriteLine(student.ToString());

            student.FirstName = "James";
            context.SaveChanges();

            student = context.Student.FirstOrDefault(x => x.Id == 1);

            Console.WriteLine(student.ToString());

            Console.ReadLine();

        }
    }

    private static void AddStudentData(TrainingContext context)
    {
        context.Student.Add(new Student { Id = 1, FirstName = "Joe", LastName = "Blogg" });

        context.Student.Add(new Student { Id = 2, FirstName = "Jane", LastName = "Doe" });

        context.SaveChanges();
    }
}
As you can see we first retrieve the student with id 1 then we changed the first name of the student and asked entity framework to save the changes into the in-memory database.
And below is the output of the before and after state of that record.


